Sunday, February 26, 2012

Conversation Killing Chili Sauce

This stuff is good - really good - but it is certainly not for the faint of heart or tastebuds. This recipe makes a chili sauce that is sweet and tangy up front, but then kicks your ass with the heat on the back end. This is a general recipe for the small batch that I made last week, you would need to at least double to get a whole small jar.


Stuff You Need

o  Large mortar and pestle
o  25 dried chili peppers (I used new mex twilight, machu piccu and thai chilis)
o  4-6 garlic cloves, peeled and diced
o  salt
o  sugar
o  1 tsp Ethiopian curry
o  1/2 tsp powdered ginger
o  3/4 tsp mustard seed
o  1/2-1 cup rice vinegar
o  1/4 tsp orange zest


Putting it Together
Grind the chili peppers with the mortar and pestle until they  take on a uniform texture and there are no large flakes or chunky bits. Add the garlic and grind until thoroughly blended into a paste. Add in the ginger, mustard, curry, a small pinch of salt and 1/2 tsp of sugar to start. Grind well. 
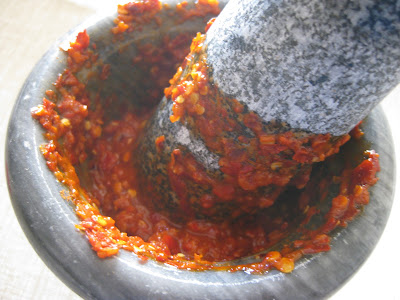
Add a few tablespoons of rice vinegar at a time, mixing and grinding well before adding more. The desired texture is thick and wet (see below pic). Once you've got the texture right, taste a tiny bit and see if you need to add more salt (maybe) or sugar (probably). Add orange zest and grind.
Add sauce to a skillet and simmer over medium high heat until any excess liquid has cooked off, being careful not to let anything burn. 
Remove from heat, let cool, and pour into a sterile jar. Wash your hands thoroughly with soap and water. 
Enjoy responsibly! 


Saturday, February 25, 2012

The Stew to End All Stews

I really, really like stew. I like to cook it and eat it and share it with the people in my life. I've tried out a number of stews over the years, and this is the one that I make now.  A good stew is labor intensive and takes time, so make sure you have at least 3-4 hours to get down.


Stuff You Need

o  Cooking oil & olive oil
o  16-20 garlic cloves, peeled and crushed
o  2 cups diced onion
o  3-3.5 lbs stew beef, cut into small cubes, 1"x1"
o  1.5-2 cups dry red wine
o  2 cups chopped carrot
o  2 teaspoons finely chopped fresh rosemary
o  1 teaspoon black pepper
o  2 bay leaves
o  2 cups beef broth
o  2 (14.5-ounce) cans diced tomatoes, with juice
o  3 pounds peeled potatoes, cut into 2-inch pieces 
o  1 cup water
o  1 tablespoon butter
o  2-3 tablespoons flour
o  1.5 cups green beans, stems removed, cut into 1”-2" pieces
o  2 cups portabella mushrooms, cut into pieces


Putting it Together
Preheat oven to 300°.
Heat a large Dutch oven or all metal soup pot over medium-high heat. Coat pot with cooking oil. Add garlic and sauté until it begins to brown. Set the garlic aside in a big bowl and re-coat the pan with oil. Sauté your onions until they get translucent and tender, and then add them to the garlic bowl and re-coat the pot with oil. Add 1/3 of the beef to the pan and brown it on all sides. Dump the meat and meat juice in the garlic bowl. Repeat until all meat is browned and added to the garlic/onions.
Add wine to pot and bring it to a boil. Add beef, onions and garlic to the pot, and stir in beef broth, tomatoes (with juice) and water. Add bay leaves, pepper and rosemary. Bring to a boil and then add carrots and 1/3 of your potatoes - these will cook into the broth. Turn off the stove, cover the pot and bake at 300°. 
Now is a good time to prep your mushrooms. Heat a couple of teaspoons of olive oil in a skillet over medium high heat and add mushrooms. Sauté until cooked down and tender, adding salt and pepper to taste. Put mushrooms and juices aside in a bowl. Wash your pan and melt the butter, adding in the flour until it makes a nice thick roux.

Remove the stew pot from the oven after an hour to an hour and a half. Add the rest of the potatoes, beans, mushrooms and roux. Now is a good time to test the broth and see what's going on. You may want to add more broth, wine or water, salt and pepper or other spices. When you're satisfied, cover the pot and bake for another hour and a half to two hours. 
Fish the bay leaves out of the pot and serve with nice crusty bread.


So I Guess It's Spring...

All the plants seem to think do anyway. We've only had 3.25 inches of rain so far this year, and our average high for February has been 62. I've got new growth on the raspberries, pomegranate, jasmine and wisteria and flower buds on the grapefruit, lemon and blood orange. I decided theres no arguing with mother nature, so it's best to just go with the flow and get a head start on summer.


I bought a sweet new shovel to replace the one that was douchily stolen from our backyard a month ago, and last week I started a bunch of seeds for the Summer 2012 garden. We've got heirloom tomatoes, sweet and chili peppers, dill, English lavender, echinacea and Roman chamomile. For info on seed starting, check my posts from last year on the subject.


This year I'm using peat pots again, but actually using potting soil, so I should already be ahead of the game :) We're adding more tomato varieties to this year's garden and a number of chili peppers I haven't grown before. I started two of each type below, and three San Marzano seeds in anticipation of my growing saucing needs:

Tomatoes
-Black Cherry
-Black Krim
-Black Prince
-Evergreen
-Green Copia
-Jaune Flamme
-Pink Ping Pong
-Primrose Gage
-Random Annie
-Red Cushion
-San Marzano
-Super Snow White

Peppers
-Sweet Bell Mix
-Sweet Cherry
-Thai Chili
-New Mew Twilight Chili
-Machu Picchu/Charapita Chili
-Scotch Bonnet Chili
-Hawaiian Chili

Somehow four of the tomatoes germinated in four days. About half of them are up now, seven days after sowing. The chamomile has been up a few days, the dill is working on it, but I have one solitary one pepper seedling barely poking through the surface. Some of my hot pepper varieties can take up to 45 days to germinate, so here's to me finding the patience to wait for them all. Game on!

Sunday, January 15, 2012

Homemade Body Butter

I find that it is easier to make homemade products in small manageable batches while I am testing out new recipes. The below is a pretty good starting recipe for anyone looking to dive in and make some nice-smelling shit that will also make your skin soft.


Stuff You Need


1 cup sweet almond oil
1 oz unrefined shea butter
4 tbsp beeswax (I like to buy it in beads so I'm not constantly hacking chunks off a block of wax)
1 tsp cornstarch
10 drops/2 capsules vitamin e oil
10 drops essential oil (I used jasmine and lavender for this project)
Hand mixer or a whisk

First things first, you've got to get things warm enough for the beeswax to melt. Take the almond oil, shea butter and beeswax and either heat gradually in a double boiler or microwave in 40 second increments until the wax has mostly melted.

Transfer to a bowl and add in cornstarch and vitamin e oil. The vitamin e acts as a natural preservative to keep the oils from going rancid, and the cornstarch will make the texture less greasy. Add essential oils of your preference (go easy on these or every time you use the butter your entire life will reek of its delicious aroma for hours).

Now mix/whisk away to your heart's content. Oh your heart is content already? Isn't that sweet. Keep mixing. This will take at least 15-20 minutes. You are aerating the mix as it cools, which will help it keep a fluffy body butter texture. You can cheat and speed up the cooling by placing your mixing bowl in a bowl filled with ice (don't let any water in the mix!) but then you have to be diligent about mixing like your life depends on it. No breaks for you. Once your butter is sufficiently fluffy and cooled (it should have peaks like merengue or whipped cream) spoon or pour it into airtight jars. Store in a cool dark place.

Finished butter in the tubs on the left!

Stay tuned for the scrub recipe coming soon!

Tuesday, January 3, 2012

Momma's Stuffing

My mum went through like 15 stuffings before she finally found one that our entire family liked. This is that stuffing. Can be made veggie if you want, subbing in apples for sausage and veg stock for chicken. But I don’t want to, cuz I love pork.

Stuff You Need

3/4 cup chopped mushrooms (don’t skimp on these babies. Get the good stuff – chanterelles, shitakes, baby bells, whatever. Just not those little white pizza death mushrooms)
3/4 cup diced onion
1/3 cup celery chopped super thin
1/3 cup butter
1/2-3/4 cup cooked spicy Italian sausage
4 cups dried bread crumbs, the more grains the better (all the grains, yes)
Lots of chicken stock to moisten. Like oceans of chicken stock. Or at least more than you think you could possibly need.  I’d say probably more than a box/ a few cans of that shit. Besides, you can never have too much stock, since you should totally also be making gravy. Oh, maybe I should do a post on gravy…
Fresh Herbs! Lots of ‘em! I like sage, rosemary, thyme and a bay leaf. You can either chop them up super fine and mix them in with the rest of the ingredients (what I do), or leave them whole, on top of the stuffing, to be removed after baking.

Cook the sausage.  You want it to be in small pieces. If I'm feeling super ambitious, I’ll squeeze the sausage meat out of the casings before cooking.

Sautee all of the veggies with the butter, adding a bit of salt and pepper to taste.

Mix all of your stuff in a deep pan – bread, sausage, veggies, herbs. I add all of the accumulated juices too, because that shit is tasty. Moisten liberally with the stock. If you have bird drippings you can use those too for extra tastiness.

Stick your stuffing in the oven at about 300-350 degrees, but don’t forget about it for too long. When it looks like it’s starting to get toasty and dry out, take it out, toss everything and add more stock. Add some extra butter if you want, I won't tell. 

KEEP DOING THIS WHOLE DRYING THEN MOISTENING THING until you are sure your stuffing has been saturated and then re-toasted to your desired level of crispy. Since everything is already cooked, it doesn't really matter how long you do this part, but I like my bread crumbs to be a little crisp and herby on the outside and deliciously stock and butter flavored on the inside.

I’m pretty sure that’s it. Easy peasy.

Full disclosure: I hate soggy or jiggly foods, so in-bird stuffing is useless to me unless it has been removed from the bird carcass and recrisped in the oven separately. But you could totally do it in-bird if you want. 
Food, Glorious Food!


Since it is now January and my garden has pretty much gone dormant, I’ve decided this is a great excuse for me to post some of the recipes I’ve been meaning to get up here! I've been posting about all this crap I grow, with nary a mention of what it is I do with it!

So I don’t lose track of what I want to do, here are the recipes I’m planning on getting up here as soon as I sober up. Oh 2012, you are already the shit.

            -Jam’s Awesome Sauce Rib Rub
            -Momma’s Multigrain Stuffing
            -The Stew to End All Stews
            -Homemade Body Butter
            -Homemade Body Scrub
            -Save Your Life Salve

I’m sure there are plenty more recipes banging around this ol’ noggin just begging to be posted, but I like to have tangible attainable goals. So there you have it.