Today's Lesson:
Things that will grow with no direct sunlight - kohl rabi, garlic, onions, radishes, artichokes, beets, dinosaur kale. Maybe the carrots?
Things that will not - everything else I planted in the winter garden, including but certainly not limited to bok choy, mustard greens, all the basils, mache, butterleaf lettuce, spinach, chinese kale. Maybe the carrots :(
Things that may well have made it, had it not been for the gluttony and ambition of a monster slug colony - acorn and butternut squash, brussels sprouts.
Pretty much everything that we started inside got munched up overnight by those motherfucking slugs. Who knew they could do so much damage in less than 24 hours?!? When I set out the beer trap the next day, I caught at least 20 happy fat slugs and 2 jerusalem crickets and didn't feel bad about it one bit. Douchebags.
Aside from discovering which of my seeds can survive in seriously low light, this development was a serious bummer. I had all of these lofty dreams of hearty winter vegetable soups, which are now clearly unlikely to come to fruition. Once the days start lengthening again (Thursday! Woot!), I may give the winter crops another go, even though I am wary of wasting seeds. And who knows, if I give them enough time, some of the seeds could well sprout once it warms up a bit in a couple months.
If I do end up resowing this winter, you'd better believe I'll be putting each little seedling inside a little fence of plastic cut from bottles and what not to keep the Colonial Slugs from stealing my thunder.
Monday, December 19, 2011
Monday, October 24, 2011
Project Update 2.2 - Seed Saving!
Saving seeds is one of my favourite parts about gardening. So much possibility and so much room to fuck it all up. High stakes gardening and what not, since your seed saving skills may determine what you have to plant next season. Some seeds are super easy to save, and others have all kinds of stratification and pre-treatment requirements. It's a good idea to familiarize yourself with common seed saving terms before getting started.
The first thing to do is establish from which fruit or plant you would like to save seeds. You should choose based on desired traits and characteristics, such as flavor, colour, size, disease resisitance and time to maturity. Usually, you will have to grow your produce for more time and to a larger size than normal. Culinary ripeness (good for eating) is usually not considered physiologically ripe (viable seeds produced). For example, I harvest my french round squash at 3"-4" for eating, but leave the seed saving squash on the plant for an extra couple of months, until it reaches 6"-8", forms a hard outer shell and turns a yellow-ish colour.


To save squash seeds (or any cucurbit), you first need to gut your squash, and separate all the flesh and pulp from the seeds. If any seeds are small, thin, or flimsy discard them right away, as they probably won't be viable anyway. Rinse your seeds in cold water to get all the slime and gunk off, pat them dry and then place them on paper towel in a single layer to dry out completely for a week or so. I usually flip mine after a couple of days do encourage even drying. Once your babies are thoroughly dried, store them in a small ziploc or glass jar and be sure to label them with the variety and seed saving date. Bam. It's that easy.
When saving tomato seeds, I prefer to undertake the process when I am already canning or making tomato sauce, since those processes already require separating the seeds (and skins) from the flesh, and I don't like to waste anything.

Tomato seeds need to ferment a bit, so I put the pulpy seeds into shot glasses with a few drops of water and loosely cover them with paper towel to keep fruit flies out.

After a few days some of the water will have evaporated and the pulpy casing around the seeds should be fermented and more thick. Dump the mess in a sieve (make sure the holes are more fine than your seeds!) and run cool water over it and give the goo a little rub. The mess should wash away easily, and you will be left with just the seeds. Spread these out on a paper towel, and once they are completely dry, bag 'em and tag 'em.
*Note about saving tomato seeds: The tomatoes I grow are all open pollinated (OP) heirlooms, so there is a high likelihood of cross-pollination. This means that plants I grow from my saved seeds, with likely not be true to type, and instead create some new kind of heirloom hybrid tomato. I don't mind, because this is all one big experiment for me and I like the idea of making brand new cultivars, but if you want to keep your seeds true to type, tie paper bags over the flowers you want to isolate. Tomatoes are largely self fertile, so the fruits should still develop, but the flowers won't have an opportunity to be cross polinated by insects and the next generation of plants should be true to type.
The first thing to do is establish from which fruit or plant you would like to save seeds. You should choose based on desired traits and characteristics, such as flavor, colour, size, disease resisitance and time to maturity. Usually, you will have to grow your produce for more time and to a larger size than normal. Culinary ripeness (good for eating) is usually not considered physiologically ripe (viable seeds produced). For example, I harvest my french round squash at 3"-4" for eating, but leave the seed saving squash on the plant for an extra couple of months, until it reaches 6"-8", forms a hard outer shell and turns a yellow-ish colour.

French round squash at edible size/maturity.

6 lb. squash for seed saving.

Squash guts and seeds.

Fun with squash!
Sometimes you'll get a seed surprise, and a couple of them will have started to germinate before you even open the squash. 
Seed surprise! These three started germinating inside the squash.
To save squash seeds (or any cucurbit), you first need to gut your squash, and separate all the flesh and pulp from the seeds. If any seeds are small, thin, or flimsy discard them right away, as they probably won't be viable anyway. Rinse your seeds in cold water to get all the slime and gunk off, pat them dry and then place them on paper towel in a single layer to dry out completely for a week or so. I usually flip mine after a couple of days do encourage even drying. Once your babies are thoroughly dried, store them in a small ziploc or glass jar and be sure to label them with the variety and seed saving date. Bam. It's that easy.
When saving tomato seeds, I prefer to undertake the process when I am already canning or making tomato sauce, since those processes already require separating the seeds (and skins) from the flesh, and I don't like to waste anything.

Tomatoes prepped for sauce: blanched, peeled,
seeds removed and set aside.
Tomato seeds need to ferment a bit, so I put the pulpy seeds into shot glasses with a few drops of water and loosely cover them with paper towel to keep fruit flies out.

Flamme and Mystery Yellow tomato seeds.
After a few days some of the water will have evaporated and the pulpy casing around the seeds should be fermented and more thick. Dump the mess in a sieve (make sure the holes are more fine than your seeds!) and run cool water over it and give the goo a little rub. The mess should wash away easily, and you will be left with just the seeds. Spread these out on a paper towel, and once they are completely dry, bag 'em and tag 'em.
*Note about saving tomato seeds: The tomatoes I grow are all open pollinated (OP) heirlooms, so there is a high likelihood of cross-pollination. This means that plants I grow from my saved seeds, with likely not be true to type, and instead create some new kind of heirloom hybrid tomato. I don't mind, because this is all one big experiment for me and I like the idea of making brand new cultivars, but if you want to keep your seeds true to type, tie paper bags over the flowers you want to isolate. Tomatoes are largely self fertile, so the fruits should still develop, but the flowers won't have an opportunity to be cross polinated by insects and the next generation of plants should be true to type.
Glossary of Gardening Terms
acid - having a pH of less that 7
alkaline - having a pH of more than 7
annual - A plant that completes its life cycle in one year or less.
biennial - A plant that lives for up to two years under outdoor conditions, flowers and produces seed the second year.
bolt - When a plant flowers prematurely.
characteristics - General features caused by unidentified complexes of genes including but not limited to freeze tolerance, cold tolerance, regional adaptability, winter hardiness, early maturation, and flavor.
cross-pollination - When pollen is exchanged between different flowers from the same or different plants.
cultivar - A horticultural variety or strain that originated and has persisted under human cultivation.
damping off - Over watering seedlings promotes the growth of mildew that causes seedlings to keel over with shriveled stems. The most common disease of greenhouse seedlings, it is aggravated by extreme swings in temperature like warm days and cold nights. The best prevention is to water in mid-morning and to allow the soil surface to dry out between waterings.
deciduous - A plant that produces fresh leaves annually (and sheds old leaves)
determinate/indeterminate - Determinates flower once or twice a growing period, usually early in the season, and yield mature harvests all at one time. Indeterminate plants flower and fruit continuously throughout the growing season.
dormancy - A period of low or absent plant growth
hardening off - A process of helping plants that have been raised under cover to adapt to cooler outdoor conditions and direct sun. Gradually introducing greenhouse plants to outside conditions for one to two weeks before planting in the ground is one recipe for hardening-off.
heirloom - Time-tested, open-pollinated varieties of primarily European descent, that have been passed down for at least three generations. For many reasons, including flavor, vigor, local hardiness and dependability, these have become favorites. Often, heirloom seeds are the repository of unusual genes that can help to preserve genetic diversity.
epiphyte - A plant that has aerial roots, used to grip trees. (ex: some ferns, moss and orchids)
F1 hybrid - The "F" in F1 hybrid stands for filial or offspring. F1 means the first generation offspring after cross-pollination. The majority of F1 hybrids are sterile or produce offspring unlike themselves. See "hybrid."
gound cover - Carpeting species that rapidly cover bare ground.
hybrid - Varieties resulting from natural or artificial pollination between genetically distinct parents. Commercially, the parents used to produce hybrids are usually inbred for specific characteristics.
hydroponics - Method of growing plants in a liquid culture
inbreeding depression - A loss of vigor because of inbreeding. Inbreeding is the result of self-pollination or pollination between two close relatives.
insect pollination - Pollen is carried from one flower to another by insects.
loam - Fertile soil that retains moisture while remaining well-drained
monecious - A species is monecious if it produces single plants with separate male flowers and female flowers on the same plant. (ex: french round squash)
mulch - Organic matter placed over the soul to conserve moisture and keep frost from the roots and weed growth.
mutation - Abrupt change in plant’s habit
neutral - Having a pH of 7
offsetting - A plant that produces miniature replicas of itself, usually around its base (ex: artichoke)
open-pollinated - Open-pollinated varieties are stable varieties resulting from the pollination between the same or genetically similar parents. Not hybrid.
organic - A substance produced by plants or animals via natural means
ovary - The female part of a flower that contains the ovules. Fertilized ovules develop into mature seeds.
perennial - Plant that lives for at least three seasons.
perfect flowers - Individual flowers that contain both stamens and pistils.
Perlite -Sterile granular form of aluminum silicate used in composts.
pH - Scale by which acidity or alkalinity of soil is measured.
pistil - The female reproductive organ in a flower made up of the stigma, style, and ovary.
pollen - Equivalent of sperm in plants. Pollen grain fertilizes plant ovules.
pollination - The process of sexual fertilization in plants. The male chromosomes contained in pollen are combined with the female chromosomes contained in the ovules.
recessive trait - The variation of a specific, identifiable gene that results in observ able traits only if the dominant trait is not present. For example, wrinkled pea seeds result only in varieties where the dominant smooth-seed trait is missing.
rogue - The process of removing or destroying plants with unwanted characteristics or traits.
scarification - To abrade, scratch, or modify the surface for increasing water absorption.
selection - The process of saving the seeds from plants that exhibit desirable charac teristics and traits. To identify desirable characteristics, plant the same variety in different environmental conditions, or plant different varieties in the same environ mental conditions.
self-pollination - When pollination takes place within a single flower, usually before it opens. Other flowers or plants are not needed. Self-pollinating flowers are called "perfect flowers" because they contain the stamens that produce pollen and the pistil that receives the pollen. Isolation distance to prevent cross-pollination is not necessary unless insects are known to invade the flowers before pollination is complete.
stamen - A flower's male reproductive organ consisting of the filament, anther, and pollen.
stigma - The opening in the pistil through which the pollen passes to the ovary.
style - Contains the pollen tube between the stigma and the ovary through which the pollen is carried.
sucker - shoot that grows from the rootstock (or from the crotch between the stem and a branch on a tomato plant).
traditional/native - Open-pollinated varieties that have evolved through centuries of growing by native/indigenous peoples of the world. They are often drought and pest resistant, hardy and nutritious and are still cultivated around the world.
trait - A specific feature traced to an identifiable gene or group of genes. Pea traits traceable to single genes include vine growth (bush or tall), seed texture (smooth or wrinkled) and disease resistance (fusarium, enation mosaic, and powdery mildew).
untreated seeds - Have not been coated with fungicides, herbicides, fertilizers or growth hormones.
viable - A viable seed is one that will germinate and produce a vigorous plant. Seeds must not be harvested before they have matured enough to be viable. There is wide variation in the point of maturity at which a seed can be harvested and still be viable.
vigor - Strong, vibrant germination and growth. A desirable characteristic.
wind pollination - When pollen is carried from one flower to another by the wind.
Tuesday, October 4, 2011
Prepping the Cold Season Garden
The weather is changing; I can smell it. And even though my summer crops are still producing in our temperate Bay Area climate, it is time to look ahead to what is next.
By the time Labour Day rolled around this year, I had already planned out the winter garden. This was a first for me and made infinitely easier by the Jamilah's Garden Binder I started keeping this year. I've pulled together information on companion planting, seed starting, tips for care and recipes, along with a bunch of copies of a skeleton diagram of the garden I drew out.

Keeping all of this information in one place has been really valuable, in that I have the answers to most of my questions already at my fingertips. Planning this way also lets me keep the diagrams of past gardens to reference what worked and what didn't, without relying entirely on my decidedly shoddy memory.


The first item on my list of 'crap to do that isn't that exciting but needs to be done anyway', is pulling plants that are done for the season, and tilling the soil mixing in lots of organic matter. I've got half of the garden dug up now, but I'll have to wait a bit on doing the other side because the tomatoes are still doing their thing. We had a powdery mildew problem late in the growing season with our french round squash that luckily didn't spread to any of the other plants.

I've left one of the plants in the ground as long as I can, because I am growing a couple of squash to pumpkin size to harvest their seeds for next year. Alas, I can't wait any longer, as that area needs to be prepped asap for the garlic to be planted. That (and carving said 'pumpkin') will be a project for this weekend. I will be watering down the entire area with neem oil, to try to kill any powdery mildew spores that would likely overwinter in the soil in our climate. Hopefully the garlic will be able to be planted before the end of the month.
Since I've already planned the garden, I was able to start a lot of my cold season seeds last week! We've got golden and chioggia beets, chinese kale, brussels sprouts, cauliflower, and acorn and butternut squash all sprouting in our craft room.

The most important part about germinating seeds is getting the right temperature and moisture level, although light (or dark) and oxygen are also necessary. I manage my seed starting environment by putting my peat pots inside a mail bin, and then putting that mail bin inside a white garbage bag with the end open. Most of the seeds I grow don't require light until they have sprouted (although some do), but I do provide them with light right off the bat because I find it increases the humidity in the bin, and the light will be available the second the seeds have sprouted. So sue me.

Once these babies have a few true leaves, I'll start the hardening off process and get them in the ground! It's been awhile since I got my hands dirty, so I am rather looking forward to it.
By the time Labour Day rolled around this year, I had already planned out the winter garden. This was a first for me and made infinitely easier by the Jamilah's Garden Binder I started keeping this year. I've pulled together information on companion planting, seed starting, tips for care and recipes, along with a bunch of copies of a skeleton diagram of the garden I drew out.

Keeping all of this information in one place has been really valuable, in that I have the answers to most of my questions already at my fingertips. Planning this way also lets me keep the diagrams of past gardens to reference what worked and what didn't, without relying entirely on my decidedly shoddy memory.

Blank garden planning diagram.

Summer 2011 Plan.

Planned Winter 2011/12 Garden.
The first item on my list of 'crap to do that isn't that exciting but needs to be done anyway', is pulling plants that are done for the season, and tilling the soil mixing in lots of organic matter. I've got half of the garden dug up now, but I'll have to wait a bit on doing the other side because the tomatoes are still doing their thing. We had a powdery mildew problem late in the growing season with our french round squash that luckily didn't spread to any of the other plants.

French round squash pumpkin, and the beginnings of
our powdery mildew issue.
I've left one of the plants in the ground as long as I can, because I am growing a couple of squash to pumpkin size to harvest their seeds for next year. Alas, I can't wait any longer, as that area needs to be prepped asap for the garlic to be planted. That (and carving said 'pumpkin') will be a project for this weekend. I will be watering down the entire area with neem oil, to try to kill any powdery mildew spores that would likely overwinter in the soil in our climate. Hopefully the garlic will be able to be planted before the end of the month.
Since I've already planned the garden, I was able to start a lot of my cold season seeds last week! We've got golden and chioggia beets, chinese kale, brussels sprouts, cauliflower, and acorn and butternut squash all sprouting in our craft room.

Grow baby, grow!
The most important part about germinating seeds is getting the right temperature and moisture level, although light (or dark) and oxygen are also necessary. I manage my seed starting environment by putting my peat pots inside a mail bin, and then putting that mail bin inside a white garbage bag with the end open. Most of the seeds I grow don't require light until they have sprouted (although some do), but I do provide them with light right off the bat because I find it increases the humidity in the bin, and the light will be available the second the seeds have sprouted. So sue me.

Acorn squash seedlings.
Once these babies have a few true leaves, I'll start the hardening off process and get them in the ground! It's been awhile since I got my hands dirty, so I am rather looking forward to it.
Monday, September 19, 2011
Project Update 2.1 - Corn!
So, corn. This might be my biggest failure of the year (so far at least - we still have 3 months to go!). As I posted previously, I didn't plant enough corn for the silks to be wind pollinated effectively. The plan was to get out there a couple of times a week and collect the pollen from the tassels to sprinkle on the silks. Well, I maybe did it twice. All summer. This is partly because the french round squash was so damn prolific that I couldn't really get to the corn to pollinate it. Partly cuz I'm lazy, let's be real.
So what we got was 6 or 8 ears of corn about 6 inches long and about half of them were decently pollinated - most of the kernels (at least 3/4) were plump and juicy and had great flavour. The other half were pretty pathetic. We're talking less 2/3 of the kernels were shrivelled and lame. We also had a few hilariously tiny ears - one of which was no more than an inch and a half long with about 7 formed kernels.

The reason I'm getting a second chance for romance with hand pollination, is the corn we planted from seed has put up tassels now, and is working on silks. These plants are much more compact than the others - shorter and stockier - and put out tassels (red!) at about 3 ft high.

We pulled one of the squash plants a couple of weeks ago (powdery mildew all up in my life), so I will no longer be able to use that as an excuse. The plan now is to get a bunch of smallish paper bags and some twist ties, and just leave the damn bags tied to the corn to collect the pollen. Then, once all the silks are out, I will gently bend the stalks so the bag of pollen is right-side-up when removed, and use a paint brush to apply the pollen to the silks. This is the plan. We shall see if I stick to it :)

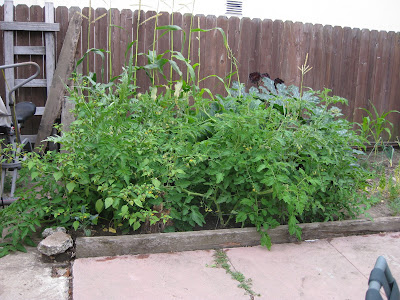
Left side of the garden with epic squash, a jungle of tomatoes and both corn plantings.

The first corn harvest!
The reason I'm getting a second chance for romance with hand pollination, is the corn we planted from seed has put up tassels now, and is working on silks. These plants are much more compact than the others - shorter and stockier - and put out tassels (red!) at about 3 ft high.

Emerging red corn tassels.
We pulled one of the squash plants a couple of weeks ago (powdery mildew all up in my life), so I will no longer be able to use that as an excuse. The plan now is to get a bunch of smallish paper bags and some twist ties, and just leave the damn bags tied to the corn to collect the pollen. Then, once all the silks are out, I will gently bend the stalks so the bag of pollen is right-side-up when removed, and use a paint brush to apply the pollen to the silks. This is the plan. We shall see if I stick to it :)
Tuesday, September 6, 2011
Project Update 2.0
A quick update on some of our garden projects:
Lazy Potatoes
We finally harvested one of the lazy potatoes crates! I LOVE digging through the dirt to find potatoes; it's proof that there is way more going on under the soil than we assume. The red potatoes are still growing strong - their stalks are still green for the most part. The yellow potatoes on the other hand had completely died back. So I dug em up, and this is what we got in terms of big-enough potatoes:


Tomatoes From Seed


Lazy Potatoes
We finally harvested one of the lazy potatoes crates! I LOVE digging through the dirt to find potatoes; it's proof that there is way more going on under the soil than we assume. The red potatoes are still growing strong - their stalks are still green for the most part. The yellow potatoes on the other hand had completely died back. So I dug em up, and this is what we got in terms of big-enough potatoes:

I ate a couple of these guys baked and they were delicious! Very potato-y. There were also twelve teeny tiny potatoes, most smaller than a thumbnail. I decided to see if I can get those to grow any larger, so I replanted them in the crate, and lightly covered them with soil. We'll see if anything happens by the time the red guys are ready for harvest.
Pomegranate
It took a couple of months, but all of the blossoms have officially dropped off my beloved pom. Sad face. On the upside though, I was free to prune back the extra branches and numerous suckers that have sprouted this year. I did a little research into different styles of pruning, and decided to keep three main stalks. This will give the plant more of a bush appearance than a tree appearance, and since my pom is a dwarf variety (i think...bought it before I had myfolia.com to supplement my shoddy memory) a bush shape made more sense to me. Plus, I couldn't bear to cut it back to just one stalk after all the hard work it put into growing the rest this year.

The pomegranate in the spring, shooting suckers from the base and pretending
like it was gonna make me some fruit.

Pruned pomegranate with only three main stems remaining
and criss-crossing branches removed.
There appears to be two main methods of pruning a pomegranate: the landscape aesthetic and the fruit-bearing priority. For the former, you trim branches down to the trunk, as well as most/all of the suckers, and any criss-crossing branches. If you leave one stem, you will eventually have a tree shape to your pomegranate plant. I opted to leave 3 main stems to maintain the plant's natural vase like shape. And I think the foliage is pretty, so there's that.
The second method is generally used by commercial fruit growers who want to increase their yield and have little need for an aesthetically pleasing plant. For this method, all stems and branches are shortened to increase spring growth and therefore flowers anf fruit. There is also the advantage of keeping the plant compact and the fruits easy to harvest. But you are left with an unsightly stump from which all the branches grow.
When I pruned my pom this weekend, I decided to use the cuttings to try to clone my plant. I had four good looking cuttings, 8-14 inches long. I've dipped them in rooting powder and placed in our kitchen to hopefully do their thing! One of the clones, I can already tell, is not going to make it. But that still leaves 3 possibilities, so fingers crossed!

Photo snapped three days after cuttings were taken; most seem to be doing pretty well.
Tomatoes From Seed
I've mentioned numerous times that we started our tomatoes super late, so I'm not going to get into that today. But it is very interesting, if not exactly surprising, to note a few differences among tomatoes all started from seed at the same time. The plants that are in-ground have out-grown and out-produced the container tomatoes by easily 5x-10x.

Sad looking container tomatoes. The clear container tomatoes no longer exist due to an
unfortunate run in with the neighbor kids' basketball.
The five plants in the garden have taken over; even plants that would normally grow prolifically, like the artichoke and tomatillos, have been dwarfed by the tomatoes. The plants reached about six feet tall with a spread of 8-10 feet last week (that's per plant, not all together) and are still producing massive amounts of flowers.

It's a jungle in there.
In an effort to get more sunlight onto the tomatoes themselves, I've been pruning back the leafy green growth once or twice a week for the past month. And honestly, they bounce back so quickly, you can hardly tell. I finally decided to trim the ends of all of the plants in an effort to keep the growth under control and also force the plants to focus on the tomatoes that are setting and ripening. My Riviera plant at this point has over thirty good sized fruits, and easily as many flowers still left on the branches.

Cluster of Riviera tomatoes.
There are more art-tomatoes forming on the Black Krim, and that first one I mentioned in the megablooms post is getting to be an impressive size.

Black Krim art tomato!
As it stands right now, it looks like we will be harvesting hundreds of tomatoes at the end of September, so DudeLife and I are already plotting to get a few more flats of canning jars for sauces, salsas, pickled green tomatoes and whatever else we feel like doing. I have a feeling we'll be giving quite a few of them away to friends and family as well. I can't wait!
Project Update 2.1 (corn, squash, seed saving and vermi-compost tea!) to follow soon!
Adventures in Pickling!
We did a little maintenance harvesting after I got back from my trip to NY in July. A couple of these, a few of those - not enough for any major endeavors, but just enough to take my first stab at pickling our garden bounty! I happened to have a couple of canning jars around the kitchen that we usually use to store herbs, and all of the necessary ingredients. We picked a handful of padron peppers, some bunching onions, 5 or 6 carnival and tonda carrots, and garlic that has been drying for the last few weeks. I’ve never pickled anything before, so I picked a simple recipe from one of DudeLife's fancy cookbooks and went to town.


The Pickling Process: Peel 5 cloves garlic and 5 shallots or small onions. Slice carrots. I decided to leave the peppers whole, but they could be sliced as well. Pack sterile jar full of vegetables. Add some peppercorns and spices (I added whole mustard seed, ground cloves, fresh and dried dill, red pepper flakes, a little cayenne pepper and a bay leaf). Bring to a boil 2 cups white vinegar, 1 cup water, 1/4 cup coarse salt. Pour over vegetables to fill jar. Seal and refrigerate, giving at least a few weeks for things to get pickley.

We opened the jar up this weekend, and I'm pretty proud of our first attempt! The flavor profile of the pickley-spices was pretty good. The only thing I will be changing for sure moving forward is the amount of salt this recipe calls for - waaaaay too much. I will be cutting the salt in half the next time.
Alas, we pickled a second jar before a couple weeks before opening the first, so those ones will likely be too salty as well. The second batch was similar to the first, in that there were garden carrots, padron peppers and garlic. But we also added in sliced white and red onions, a few new mex twilight peppers and 4 or 5 super spicy dried peppers that my friend Candice grew and mailed to me.


Harvested garlic before the drying process.

Fresh picked padron peppers.

Pickle batch numero uno.
Alas, we pickled a second jar before a couple weeks before opening the first, so those ones will likely be too salty as well. The second batch was similar to the first, in that there were garden carrots, padron peppers and garlic. But we also added in sliced white and red onions, a few new mex twilight peppers and 4 or 5 super spicy dried peppers that my friend Candice grew and mailed to me.

New mex twilight peppers: fruits grow upright, start off dark purple, fade
to light purple streaks, then ripen yellow to orange to red.
Thursday, September 1, 2011
Lesson Learned: Never, Ever Rent a Place Where The Landlord Lives on Site
Oy, where to even begin. We’ve been in our new house for about 5 months now, and until recently we hadn’t had many problems with our landlady living beneath us. Alas, times have changed. Last week our landlady came upstairs and informed us that she will be refinishing the fence and then repainting the exterior of the house. Which is cool, classing things up a bit would be nice. What wasn’t cool was the fact that it was 7pm on a weekday, and she wanted all of my container plants moved away from the fence by the next day so they could begin work on the fence. So we moved them that night, in the dark, to the center of the back patio. And then…
Nothing. They sanded part of the fence along the driveway but never made it to the backyard area. Aaaaand now they appear to have given up completely? I’m not exactly pleased about having everything in disarray, especially for no reason, especially because the landlady has had so much attitude with us lately. I’ve posted before and after pics of the container moving sitch.
Then last night we came home to a note on our door, from the landlady, informing us that the house painting will be happening first and all of the plants in the alley and against the house need to be moved by tomorrow to the “right side of the property” whatever that means without any context.
Now, the fact that she misinformed us last time and now I will be moving all of the plants twice (some of which require at least 2 people to move) would, alone, probably be just an annoyance. But she has also stipulated that during the two weeks of work, we are not allowed to be on our front stoop ever, any plants not immediately moved to a satisfactory (yet unclear) place will be thrown out and that we should be prepared for noisy construction from 7am-7pm until at least 9/15.
Oh, and she wants to do a monthly inspection of our apartment “to assess needed repairs”. Which is total BS. And no. Not gonna fucking happen. We are not children, or in transitional housing. Aaaand I’m pretty sure that’s illegal in California.
We pay our rent in full and on time, and honestly we’re pretty lame. We hardly ever party or get rowdy, and rarely have people over. Honestly, we’ve had one gathering, a housewarming party over a long weekend, that was over at 11pm. If she had said “I’d like to set up a time and date to walk through the property to see what needs to be fixed,” that would have been one thing. But she is demanding full access to a space in which she doesn't live, threatening to throw out any plants not moved to whatever location she has in her head, and demanding we don't sit or smoke on our own front porch and instead use the back yard. Which would be weird even if the backyard wasn't totally fucked right now. Seriously. Check out these before and after pics from the plant move, and then try to tell me that's where we have to hang out.

Before: tidy & organized

After: A total clusterfuck of plants and furniture

Doesn't this look inviting?
We were really hoping this would be a long term living situation, but it’s looking like that won’t be the case. I’m not sure why she has her knickers in a twist, but if this is what we have to look forward to from here on out, we’re going to have to start looking into other options. This is ridiculous. And it makes me sad. I wish she would just tell her what she's pissed about so we could fix it. But alas, she won't return voicemails or phone calls and her only communication setting seems to be attitude.
Wednesday, August 10, 2011
Aphids: The Bane of My Existence
Seriously. Fuck aphids. Every. Single. Garden. I've ever had has been overrun with those pesky bastards. I started out combatting them with the usual organic methods: a combination of garlic powder, black pepper and cayenne around the border to start. Did nothing. Then insecticidal soap. Did almost nothing. You have to apply it practically twice a day and make sure you saturate all the little buggers for it to be effective, so it isn't conducive to larger scale pest control (great for indoor plants though!). My last super effort was to cook up a huge pot of water with garlic, onions, hot peppers and neem oil. This was by far the most effective of my topical efforts, but still, the mixture needed to be applied at least twice a week. And I thought I was never, ever going to get the pungent smell out of my house.
I've heard about hanging banana peels in your plants to ward 'em off, but that seems to me like it would just invite a host of other, larger and possibly much more detrimental pests to the garden (think raccoons, rats, more filthy feral cats).
The only solution I have found that absolutely works is ladybugs. I haven't used them yet this year, because I was hopeful at the start of the season that it wouldn't be needed, but hot damn. My garden is under seige and I need to get some ladybugs stat! My artichokes seems to be a catch crop for the aphids.


Of course, then you have to deal with a sort of ladybug graveyard once all is said and done, but I don't stress on it. They lived a happy happy life in my garden, gorging on aphids and then hopefully laying eggs to repopulate my favourite aphid-assassin species. If you are going to use ladybugs to control your aphid or other pest problem, it is a good idea to become familiar with the ladybug life cycle. Eggs are laid on the underside of your plants, and the larvae look nothing like adult ladybugs. Even so, they can eat hundreds of aphids at that stage, so you want to make sure you know what they look like and aren't accidentally destroying these good guys.

I've heard about hanging banana peels in your plants to ward 'em off, but that seems to me like it would just invite a host of other, larger and possibly much more detrimental pests to the garden (think raccoons, rats, more filthy feral cats).
The only solution I have found that absolutely works is ladybugs. I haven't used them yet this year, because I was hopeful at the start of the season that it wouldn't be needed, but hot damn. My garden is under seige and I need to get some ladybugs stat! My artichokes seems to be a catch crop for the aphids.

Which would be fine, if I didn't love my chokes more than most of the other plants. Also, if it hadn't spiraled out of control seemingly overnight. The chokes in last year's garden were under an attack almost as vicious, but once I released my swarm of ladybugs, they had it under control in a day or 2.

Of course, then you have to deal with a sort of ladybug graveyard once all is said and done, but I don't stress on it. They lived a happy happy life in my garden, gorging on aphids and then hopefully laying eggs to repopulate my favourite aphid-assassin species. If you are going to use ladybugs to control your aphid or other pest problem, it is a good idea to become familiar with the ladybug life cycle. Eggs are laid on the underside of your plants, and the larvae look nothing like adult ladybugs. Even so, they can eat hundreds of aphids at that stage, so you want to make sure you know what they look like and aren't accidentally destroying these good guys.

Thursday, August 4, 2011
Megablooms: Fused Tomato Blossoms
I posted a while back about how epic some of my tomato flowers are. Both of my Black Krim plants have these freaky huge blossoms. I noticed that they seemed to be some sort of 2-flower mutant, and one of them has started to fruit unevenly now. It’s weird though, because there is one mutant blossom per flower cluster – all of the other ones in each group seem normal. Turns out these big guys are ‘megablooms’ or fused blossoms, and are much more likely to happen on large varieties of tomatoes.


You are probably wondering, do these megablooms make megatomatoes? And the answer is yes! – if they are sufficiently pollinated. Since there is more than one flower, the blossoms need to be pollinated more than once, or the tomato will develop unevenly, and likely be cat-faced. Some people pinch off these blossoms, since the fruit will probably be undesireable to eat, but I’m too curious for that.

I am now very much looking forward to the forthcoming art tomatoes :)

Megabloom on garden Black Krim.

Container Black Krim megabloom

I am now very much looking forward to the forthcoming art tomatoes :)
Saturday, July 30, 2011
Making Sweet, Sweet Corn: Hand Pollination
This is the first year I am attempting to grow corn. They say corn is one of the few crops to drastically improve in flavour with genetic modification and strategic cultivation. I had a $20 for $40 Groupon for Broadway Terrace Nursery, so in mid-May we took a house trip to the plant store. We found a few gems that day, not the least exciting of which were the peaches and cream corn seedlings. There were twelve plants in all, which is considerably fewer than they say you need, but I of course didn't know that at the time. So we went ahead and planted our corn in a three sisters planting with french round squash and congo watermelons and blackeye peas.

*Quick tangent about the three sisters planting: you probably want to use a vine squash instead of a bush variety. The point of interplanting the squash is to have to creep around the base of the corn and protect it from critters and rodents. That doesn't really happen with bush varieties, like the french round squash we used, as all of the squash grow along a central stalk. Once ours grew to be about 5ft in diameter, it promptly tipped over from the weight and grew into the corn. A you can see below, the plant is now stunting the growth of the very corn plants it was meant to help (right) by stealing all the sunlight and forcing the corn to grow at odd angles. The ones planted with the watermelons (left) are much happier.

Once I looked into growing corn and found information on how many rows were suggested for good pollination, I decided I should probably get some more corn in the ground and quick. I had some yellow sweet corn seeds from my purchase from Victory Seed Co., so I sowed another dozen seeds the following week. At this point the yellow corn, which gets less sun then the others, is about knee high. The peaches and cream corn on the other hand is 6ft tall and starting to do corn things.

Tassels have been forming for a couple of weeks, and now silks have started to emerge as well. Since it's become clear that the corn from seed won't be catching up (and even if it did, I've now realized I would be cross pollinating the cultivars - corn can both self and cross pollinate), I decided to look into hand pollinating the corn.

Turns out the process is simple enough. The pollen develops on the tassels at the top of the plant. Usually, it is blown through fields and onto the silks that develop on the ears-to-be along the stalks of the plants. Alas, I don't have enough corn to be able to rely on the accuracy of the wind. So to hand pollinate the corn, you gently bend the tassels into a paper bag and give the stalk a good shake. Once you've collected enough pollen, sprinkle it on all of the silks, being careful to get as many silks as possible. Each silk is connected an individual kernel that needs to be pollinated to form correctly. If you've ever had corn on the cob and noticed a shriveled kernel or two, this is due to poor pollination.


Today I completed my first pollination attempt. I plan on repeating the process every couple of days in the hopes of increasing the chances of successful plant sexy times.

*Quick tangent about the three sisters planting: you probably want to use a vine squash instead of a bush variety. The point of interplanting the squash is to have to creep around the base of the corn and protect it from critters and rodents. That doesn't really happen with bush varieties, like the french round squash we used, as all of the squash grow along a central stalk. Once ours grew to be about 5ft in diameter, it promptly tipped over from the weight and grew into the corn. A you can see below, the plant is now stunting the growth of the very corn plants it was meant to help (right) by stealing all the sunlight and forcing the corn to grow at odd angles. The ones planted with the watermelons (left) are much happier.

Once I looked into growing corn and found information on how many rows were suggested for good pollination, I decided I should probably get some more corn in the ground and quick. I had some yellow sweet corn seeds from my purchase from Victory Seed Co., so I sowed another dozen seeds the following week. At this point the yellow corn, which gets less sun then the others, is about knee high. The peaches and cream corn on the other hand is 6ft tall and starting to do corn things.

Tassels have been forming for a couple of weeks, and now silks have started to emerge as well. Since it's become clear that the corn from seed won't be catching up (and even if it did, I've now realized I would be cross pollinating the cultivars - corn can both self and cross pollinate), I decided to look into hand pollinating the corn.

Turns out the process is simple enough. The pollen develops on the tassels at the top of the plant. Usually, it is blown through fields and onto the silks that develop on the ears-to-be along the stalks of the plants. Alas, I don't have enough corn to be able to rely on the accuracy of the wind. So to hand pollinate the corn, you gently bend the tassels into a paper bag and give the stalk a good shake. Once you've collected enough pollen, sprinkle it on all of the silks, being careful to get as many silks as possible. Each silk is connected an individual kernel that needs to be pollinated to form correctly. If you've ever had corn on the cob and noticed a shriveled kernel or two, this is due to poor pollination.

Corn tassel and anters (flowers)

Silk protruding from the husk
Monday, July 25, 2011
Everything's Coming Up Milhouse!
DudeLife did such a great job of caring for the garden while I was out of town, that when I came home, I was able to immediately harvest all this awesome!

And that was to be the last of the fava beans. As it turns out, they are kind of a bitch to grow. Not that they seem to be picky about where I put them or how often they get watered or even who their neighbours are. The problem with favas is how much garden real estate they require and how many plants you need to yield a crop worth messing with.

I planted probably 10-ish fava bean seeds, and as they grew up and out they engulfed all of the neighbouring plants. And then every time it rained, the stalks would fall over from the weight, and I'd be stuck trying to figure out what was up versus down and how the hell to stake the buggers well enough to help them keep to themselves. When I returned home from NY I had had enough of the spider and caterpillar haven they were creating, so I harvested what was ready and pulled out the plants.

The beans were delicious, don't get me wrong. But a couple of bags of favas (which is certainly more than I was getting per harvest) yields barely a small bowl of shelled beans and I am damn sure I could have planted something there that would have had a better output for the real estate. I think next year I am going to try edamame, and increase our growing space by netting at least one side of our fence for vertical plants to grow up.
In other garden related news, we have our very first tiny tomatoes finally growing! As I got such a late start with my seeds this year, it's good to see my little guys finally setting fruit. These first tomatoes are on the Riviera plant in the garden, which was the first of all the 'maters to flower, so that makes sense.

By that logic, the Flamme should be next, followed by the Black Krim, the Pink Ping Pong, and lastly the sad little Super Snow White that was decimated by a vicious bird attack. Another exciting thing I noticed is how different the Black Krim flowers are from all of the others. These ones are much larger, with more of a sunflower-like appearance than the usual star shaped flowers. Peculiar. But ultimately, I'm sure, delicious.


There they are up against the fence, early in the season and reasonably sized.

This about halfway through the growing season, before the falling over.
The beans were delicious, don't get me wrong. But a couple of bags of favas (which is certainly more than I was getting per harvest) yields barely a small bowl of shelled beans and I am damn sure I could have planted something there that would have had a better output for the real estate. I think next year I am going to try edamame, and increase our growing space by netting at least one side of our fence for vertical plants to grow up.
In other garden related news, we have our very first tiny tomatoes finally growing! As I got such a late start with my seeds this year, it's good to see my little guys finally setting fruit. These first tomatoes are on the Riviera plant in the garden, which was the first of all the 'maters to flower, so that makes sense.


Regular ass tomato flower.

Big ass Black Krim tomato flower.
Subscribe to:
Comments (Atom)